
...in Guilford, CT
Via Flickr:
Projection: Cylindrical (1)
FOV: 100 x 33
Ev: 14.83
Wednesday, December 11, 2013
Monday, November 4, 2013
NH Humanitics Council speakers to Merrimack Public Library?
Merrimack & nearby folks: I'll be writing a grant to get three speakers from the NH Humanities Council to come to the Merrimack Public Library in 2014.
Take a look at the speaker list to see if there are any you'd love to see. The PDF is available on this page: http://nhhc.org/humanities-to-go-intro.php
Here is the list I've put together in rough priority order: https://dl.dropboxusercontent.com/u/966718/FriendsMPL/nhhc-grant.html
Take a look at the speaker list to see if there are any you'd love to see. The PDF is available on this page: http://nhhc.org/humanities-to-go-intro.php
Here is the list I've put together in rough priority order: https://dl.dropboxusercontent.com/u/966718/FriendsMPL/nhhc-grant.html
Saturday, August 24, 2013
Panoramas from Maine
Created using hugin, a very cool open source tools to create panoramic photos.
The stock version included in Ubuntu 12.04 is a little old. You can get a more recent version here
Friday, August 9, 2013
Install script to CollectiveAccess on a debian Wheezy server
I've been looking at using CollectiveAccess, a very nice GPL'ed cataloguing tool and web-based application for museums, archives and digital collections, to use for a local historical society and surname genealogy group. If you know me IRL, I can set you up with a test account on a CA instance.
The installation is pretty straight forward, but I took the time to automate the installation progress to install it on a stock Debian Wheezy 7.1 image running in hpcloud.com (standard.xsmall)
Download it to the server, and then as root:
ca-install.sh
The installation is pretty straight forward, but I took the time to automate the installation progress to install it on a stock Debian Wheezy 7.1 image running in hpcloud.com (standard.xsmall)
Download it to the server, and then as root:
sh ca-install.shca-install.sh
#!/bin/bash
########################################################################
# This program is free software: you can redistribute it and/or modify
# it under the terms of the GNU General Public License as published by
# the Free Software Foundation, either version 3 of the License, or
# (at your option) any later version.
#
# This program is distributed in the hope that it will be useful,
# but WITHOUT ANY WARRANTY; without even the implied warranty of
# MERCHANTABILITY or FITNESS FOR A PARTICULAR PURPOSE. See the
# GNU General Public License for more details.
#
# You should have received a copy of the GNU General Public License
# along with this program. If not, see
#
########################################################################
#
# This script will install Collectiveaccess Providence & Pawtucket
# v1.3 on a stock Debian Wheezy server.
#
# Scan down for CHANGEME and replace it with whatever you want the
# Collectiveaccess (ca) account's mysql password to be.
#
# I tested this using the "209316 – Debian Wheezy 7.1 Server 64-bit
# 20130701 (b)" base image on http://hpcloud.com
#
# -marc nozell
# marc@nozell.com
# 2013-08-08
#
apt-get update
echo "get more packages"
apt-get install apache2 mysql-server php5 php5-imagick libtiff5 libgd-tools php5-ffmpeg libav-tools ghostscript dcraw poppler-utils abiword mediainfo php-getid3 php5-mysql
echo "update php.ini"
perl -pi -e "s/post_max_size = 8M/post_max_size = 32M/" /etc/php5/apache2/php.ini
perl -pi -e "s/upload_max_filesize = 2M/upload_max_filesize = 2M/" /etc/php5/apache2/php.ini
perl -pi -e "s/memory_limit = 128M/memory_limit = 256M/" /etc/php5/apache2/php.ini
perl -pi -e "s/display_errors = Off/display_errors = On/" /etc/php5/apache2/php.ini
echo "restart apache"
service apache2 restart
echo "configure mysql -- enter the mysql root password:"
mysql -p < < EOF
create database ca;
create user 'ca'@'localhost' identified by 'CHANGEME';
grant all on ca.* to 'ca'@'localhost';
EOF
echo "get providence 1.3 kit"
cd /usr/src/
wget -c http://collectiveaccess.org/downloads/collectiveaccess-providence-1.3.tgz
echo "unpack providence"
cd /var/www/
tar zxvf /usr/src/collectiveaccess-providence-1.3.tgz
mv collectiveaccess-providence-1.3 providence
cd providence
echo "edit providence setup.php"
cp setup.php-dist setup.php
perl -pi -e "s/my_database_user/ca/" setup.php
perl -pi -e "s/my_database_password/CHANGEME/" setup.php
perl -pi -e "s/name_of_my_database/ca/" setup.php
perl -pi -e "s/my_database_user/ca/" setup.php
echo "set some providence directory protections"
cd ..
chmod a+w providence/app/tmp
chmod a+w providence
chmod a+w providence/app/lib/core/Parsers/htmlpurifier/standalone/HTMLPurifier/DefinitionCache
echo "get the pawtucket kit"
cd /usr/src/
wget -c http://collectiveaccess.org/downloads/collectiveaccess-pawtucket-1.3.tgz
echo "unpack pawtucket"
cd /var/www/providence
tar zxvf /usr/src/collectiveaccess-pawtucket-1.3.tgz
mv collectiveaccess-pawtucket-1.3 pawtucket
cd pawtucket
echo "edit pawtucket setup.php"
cp setup.php-dist setup.php
perl -pi -e "s/my_database_user/ca/" setup.php
perl -pi -e "s/my_database_password/CHANGEME/" setup.php
perl -pi -e "s/name_of_my_database/ca/" setup.php
perl -pi -e "s/my_database_user/ca/" setup.php
cd /var/www/providence/pawtucket
echo "create media softlink"
ln -s ../media ./
echo "fix pawtucket directory protections"
chmod a+w /var/www/providence/pawtucket/app/tmp /var/www/providence/pawtucket/app/lib/core/Parsers/htmlpurifier/standalone/HTMLPurifier/DefinitionCache
chmod 777 /var/www/providence/pawtucket/app/lib/core/Parsers/htmlpurifier/standalone/HTMLPurifier/DefinitionCache/Serializer
echo "Now go open http://THIS-SERVER/providence/install and complete the setup"
Thursday, July 25, 2013
Genealogy Resources @ Merrimack Public Library
Tonight I gave a presentation on using the Genealogy Resources at the Merrimack Public Library. (and internet in general)
Here are the slides:
They are available under the Creative Commons' Attribution-ShareAlike 2.0 Generic (CC BY-SA 2.0)
Here are the slides:
- 3-Genealogy-Resources-At-Your-Merrimack-Public-Library-July-2013.odp (OpenOffice format)
- 3-Genealogy-Resources-At-Your-Merrimack-Public-Library-July-2013.pdf (PDF)
They are available under the Creative Commons' Attribution-ShareAlike 2.0 Generic (CC BY-SA 2.0)
Thursday, July 11, 2013
Using GRAMPS for your Genealogy Project
Tonight I gave a presentation on Using GRAMPS for your Genealogy Project at the Merrimack Public Library. (and internet in general)
Here are the slides:
They are available under the Creative Commons' Attribution-ShareAlike 2.0 Generic (CC BY-SA 2.0)
Here are the slides:
2-Using-GRAMPS-for-your-genealogy-project.odp (OpenOffice format)
2-Using-GRAMPS-for-your-genealogy-project.pdf (PDF)
They are available under the Creative Commons' Attribution-ShareAlike 2.0 Generic (CC BY-SA 2.0)
Thursday, June 27, 2013
Getting started with your Genealogy Research talk
Tonight I gave a presentation on getting started with your genealogy research at the Merrimack Public Library.
Here are the slides:
They are available under the Creative Commons' Attribution-ShareAlike 2.0 Generic (CC BY-SA 2.0)
Over the next two weeks I'll give a talk on using GRAMPS for managing your genealogy information and one on using genealogy resources at the Merrimack Public Library such as the 'Library Edition' of Ancestry.com, other databases at the library and internet resources.
Here are the slides:
- 1-Getting-Started-Merrimack-Public-Library-June-2013.odp (OpenOffice format)
- 1-Getting-Started-Merrimack-Public-Library-June-2013.pdf (PDF)
They are available under the Creative Commons' Attribution-ShareAlike 2.0 Generic (CC BY-SA 2.0)
Over the next two weeks I'll give a talk on using GRAMPS for managing your genealogy information and one on using genealogy resources at the Merrimack Public Library such as the 'Library Edition' of Ancestry.com, other databases at the library and internet resources.
Thursday, March 21, 2013
HOWTO get your Raspberry Pi running owncloud, tt-rss and thinkup
Today a case for my Raspberry Pi arrived from Adafruit arrived and it is time for some spring cleaning.
I was running the XBMC distro on the pi, but found it cumbersome to listen to music in the home office that way. So time to start with a fresh Raspbian install.
Here are my notes:
I was running the XBMC distro on the pi, but found it cumbersome to listen to music in the home office that way. So time to start with a fresh Raspbian install.
Here are my notes:
- Get the current Raspbian release from Raspbian.org and install it on a
4GB flash disk. - Boot the new disk and make the following configurations using
raspi-configwhich is run the first time it starts up.
- Use only 16M for GPU since I'm not running an X desktop
- set appropriate timezone
- set appropriate locale
- expand fs to use entire 4GB disk
- change pi passwd
- enable ssh access
- update
- reboot - Now some miscellaneous setup to make life easier later on. Both tt-rss and thinkup require MySQL, but I'll also want to use it for
owncloud too. So install MySQL server:sudo apt-get install mysql-server
Avahi (aka bonjour) is a very nice network tool that is a DNS-less way
to announcing your hostname on the local network. Most (all) linux
tools support it, but you'll need Apple's Bonjour kit for Windows.
That means you can just 'ssh raspberrypi.local' or browse tohttp://raspberrypi.local/
sudo apt-get install avahi-utils
I like emacs and screen is useful.sudo apt-get install emacs23-nox screen
At this point I stop using the keyboard/monitor connected to the Raspberry Pi and use an ssh session from my laptop to do the rest. - First install ownCloud by taking a look here: http://software.opensuse.org/download/package?project=isv:ownCloud:community&package=owncloud. Then connect to your Raspberry Pi:
ssh pi@raspberrypi.local
sudo -i
Now run this script which I slightly modified from their page:wget http://download.opensuse.org/repositories/isv:ownCloud:community/Debian_6.0/Release.key
apt-key add - < Release.key
echo 'deb http://download.opensuse.org/repositories/isv:ownCloud:community/Debian_6.0/ /' >> /etc/apt/sources.list.d/owncloud.list
apt-get update
apt-get install owncloud
At this point you'll have all the required packages are installed. Now point a browser to http://raspberrypi.local/owncloud
You will need to create an owncloud admin account and will want to then expand the Advanced tab and to use a MySQL server instead of SQLite. Fill in root, mysql root password (I didn't bother to set an mysql admin password, so null in my case). For the database, useowncloudand database hostlocalhost. It may take a couple minutes to be complete, so be patient. - Now install tt-rss doing the following steps:
cd /var/www/wget -c https://github.com/gothfox/Tiny-Tiny-RSS/archive/1.7.4.tar.gz
And follow the instructions here http://tt-rss.org/redmine/projects/tt-rss/wiki/InstallationNotes which are essentially:tar zxvf 1.7.4.tar.gz
mv Tiny-Tiny-RSS-1.7.4 tt-rss
chown -R www-data:www-data tt-rss
You will have to manually create a mysql database and import the schemamysql -u root
mysql>create database ttrss;
mysql>quit
Now import the database schema (a fancy way to say the database tables and some initial data)
 cd tt-rss/schema
  mysql -u root ttrss < ttrss_schema_mysql.sql
And a little editing the configuration file...
  cd /var/www/tt-rss

  cp config.php-dist config.php
emacs config.php(or use vi, nano, etc)
I made the following edits:
        define('DB_TYPE', "mysql");
        define('DB_HOST', "localhost");
        define('DB_USER', "root");
        define('DB_NAME', "ttrss");
        define('DB_PASS', "");

        define('SELF_URL_PATH', 'http://raspberrypi.local/tt-rss/');
        define('SINGLE_USER_MODE', true);
Point a browser to http://raspberrypi.local/tt-rss
From there login with default login/password of admin/password and you are done. - Finally install http://www.thinkupapp.com/docs/install/quickstart.html
The one package you'll need that isn't already installed at this point is php5-curl.apt-get install php5-curl
Now get the kit. I used wget and the site provided the kit, but with an unusual name.
cd /var/www
wget -c http://thinkupapp.com/download/
mv index.html thinkup-1.3.1.zip
unzip thinkup-1.3.1
chown -R www-data:www-data thinkup
Almost done. Point a browser to http://raspberrypi.local/thinkup and complete the configuration.
database host:localhost
database name:thinkup
user:root
password: blank, in my case or whatever you set the mysql root password to.
I (and probably you) don't have a smtp server configured, so in order to activate your account, you'll need to do this: http://www.thinkupapp.com/docs/troubleshoot/common/advanced/directdb.html# mysql -u root thinkup
mysql>select id,full_name,is_activated from tu_owners;
+----+-------------+--------------+
| id | full_name | is_activated |
+----+-------------+--------------+
| 1 | Marc Nozell | 0 |
+----+-------------+--------------+
1 row in set (0.00 sec)
mysql>update tu_owners set is_activated=1 where id=1;
mysql> quit
Done! Now go back to http://raspberrypi.local/thinkup and configure the plugins to your favorite social media sites.
Monday, March 18, 2013
Trevor @ NH Mens' Gymnastics Championships 2013
Back from the NH Mens' Gymnastics Championships -- Trevor placed 2nd All Around and 1st in Floor, Rings and PBars. Nice way to end his gymnastics career.
Except for the New England Regionals the beginning of April of course.
Except for the New England Regionals the beginning of April of course.
Still Rings
Pommel Horse
Floor
High Bar
Parallel Bars
Vault
Saturday, March 2, 2013
7 hours of engineering pit from New Hampshire GSR FIRST Robotics competition compressed to 83 seconds
As soon as they opened the door at 8am this morning, I put the camera, tripod + arduino hack at the very top of the seating in the Verizon Wireless Center pointing down at the pit where the robots are prepped for competition.
*BEST* GSR (NH) FIRST Robotics time lapse in the pit (10fps)
GSR (NH) FIRST Robotics time lapse in the pit (5fps)
GSR (NH) FIRST Robotics time lapse in the pit (20fps)
After nearly seven hours (the length my camera's battery lasted taking photos every 30 seconds) there were 835 photos which were converted to an AVI using:
and then converted to a much smaller M4V file using
*BEST* GSR (NH) FIRST Robotics time lapse in the pit (10fps)
GSR (NH) FIRST Robotics time lapse in the pit (5fps)
GSR (NH) FIRST Robotics time lapse in the pit (20fps)
After nearly seven hours (the length my camera's battery lasted taking photos every 30 seconds) there were 835 photos which were converted to an AVI using:
mencoder -nosound -ovc lavc -lavcopts vcodec=mjpeg -o timelapse-10fps.avi -mf type=jpeg:fps=10 mf://*.JPGand then converted to a much smaller M4V file using
ghb aka the very handy Handbrake tool.
Saturday, February 9, 2013
Sony Alpha-100 DSLR shutter control using an arduino and reed switches
This is a follow up to my "time lapse photography using an arduino to drive a Sony Alpha-100 DSLR" post -- basically I fixed it to 'do it right' instead of it being a horrible hack.
Here is the improved circuit diagram:
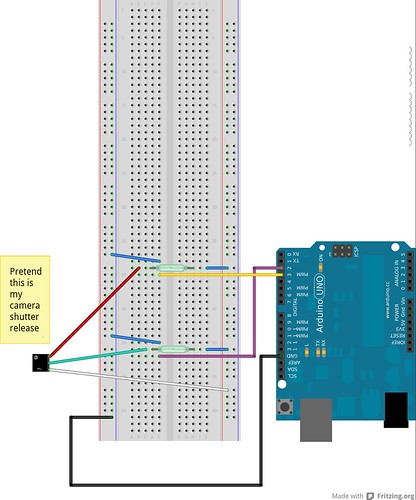
This uses two Reed Switches from Radio Shack for about $3 each -- sure I could have used other types of switches or a transitor, but they use magnetism which is cooler ;-)
Here is the improved circuit diagram:
This uses two Reed Switches from Radio Shack for about $3 each -- sure I could have used other types of switches or a transitor, but they use magnetism which is cooler ;-)
- Buy a cheap (~$7.00) shutter release cord to sacrifice to the project.
- Carefully cut and strip the wires from release cord. Shorting the green and blue wires causes the camera to focus. Shorting the green, blue and red wires after focusing causes the camera to shoot.
Remember that my soldering days are long ago (hey, it was only an EE minor) and have one of the kids at our FIRST Robotics do it for me. Here is the result. Note that blue->white.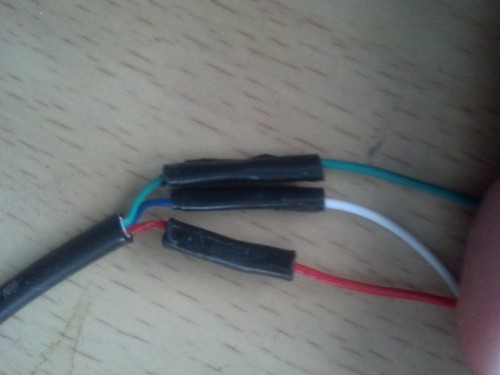
Then connected the wires from the shutter release cord to pins as follows: (see the above Fritzing image)
Green -> First Reed Switch
Red -> Second Reed Switch
Blue/White -> shared line with the other side of the switches (not this isn't tied to ground or anything else)- Now the improved code: I call it BetterCamera.ino
/*
 * A better camera control for a Sony A-100 DSLR
 * marc@nozell.com
 */

// Pin 13 has an LED connected on most Arduino boards.
// give it a name:
int led = 13;
int relayA = 2;
int relayB = 3;

// the setup routine runs once when you press reset:
void setup() {

  Serial.begin(9600);

  if (Serial.available() )
    Serial.println("-- Starting ---");

  // initialize the digital pin as an output.
  pinMode(led, OUTPUT);
  pinMode(relayA, OUTPUT);
  pinMode(relayB, OUTPUT);

}

// the loop routine runs over and over again forever:
void loop() {

  Serial.println("-- Focusing ---");

  // first focus -- short white & green

  digitalWrite(relayA, HIGH);
  delay(2000);               // 2 sec
  digitalWrite(relayA, LOW);
  delay(1000);               // 1 sec


  Serial.println("-- Take Photo ---");

  // then take a photo -- short white, green & red

  digitalWrite(relayA, HIGH);
  digitalWrite(relayB, HIGH);
  delay(1000);               // 1 sec
  digitalWrite(relayA, LOW);
  digitalWrite(relayB, LOW);

  Serial.println("-- Sleep for 30s ---");
  delay(23000);  // 2 + 1 + 1 + 3 + 23

  for (int i = 0; i < 3; i++) { // 3seconds
    digitalWrite(led, HIGH);
    delay(500);
    digitalWrite(led, LOW);
    delay(500);
    Serial.print(".");
  }
  Serial.println("!");
}
If you connect the release to the camera while the camera is on, even if here is no power to the arduino, it will take a couple photos. That is the kink.Just connect it up with the camera off and it will be fine.- Consider setting the photo size to 'standard' -- it saves a lot on disk space.
- Now find something interesting to point your camera at and come back later. In my case it was our backyard the day after the Nemo Blizzard of 2013 (we got all the snow overnight, so it isn't riveting content).
- Download all the photos to a directory and use this linux command to convert the JPG images to an AVI file.
mencoder -nosound -ovc lavc -lavcopts vcodec=mjpeg -o timelapse-30fps.avi -mf type=jpeg:fps=30 mf://*.JPG - Before uploading to youtube, I ran it through Handbrake to knock down the size from 260M to less than 70MB.
Thursday, January 17, 2013
Installing owncloud on a Raspberry Pi
Spoiler: Just follow the official installation guide and you'll be fine. Although you'll probably want to put owncloud data on external storage. Surprised? It is just another linux server!
Below are the commands I used. Those in bold are where I did something slightly different in order to change the location where files are stored. In my case I have a powered USB disk mounted on /mnt.
Then point a browser to http://raspberrypi.local/owncloud and take all the defaults. That is leave the file location as
Finally go download the sync clients from http://owncloud.org/sync-clients/ and drag-n-drop files in your ~/owncloud.
For testing I had ~180M of files in my ~/owncloud directory and the apache2 process hammered the RPi cpu for a while for the first sync from my desktop.
Below are the commands I used. Those in bold are where I did something slightly different in order to change the location where files are stored. In my case I have a powered USB disk mounted on /mnt.
$ sudo -i
[sudo] password for marc:
# apt-get install apache2 php5 php5-gd php-xml-parser \
      php5-intl php5-sqlite php5-mysql smbclient curl \
      libcurl3 php5-curl
...a bunch of packages installed...
# cd /var/www/
# tar jxf ~marc/owncloud-4.5.5.tar.bz2
# chown -R www-data:www-data owncloud/apps
# chown -R www-data:www-data owncloud/config
# mkdir /mnt/owncloud-data
# chown www-data:www-data /mnt/owncloud-data
# ln -s /mnt/owncloud-data/ /var/www/owncloud/data
Then point a browser to http://raspberrypi.local/owncloud and take all the defaults. That is leave the file location as
/var/www/owncloud/dataFinally go download the sync clients from http://owncloud.org/sync-clients/ and drag-n-drop files in your ~/owncloud.
For testing I had ~180M of files in my ~/owncloud directory and the apache2 process hammered the RPi cpu for a while for the first sync from my desktop.
Subscribe to:
Posts (Atom)