Over the next two weeks I'll give a talk on using GRAMPS for managing your genealogy information and one on using genealogy resources at the Merrimack Public Library such as the 'Library Edition' of Ancestry.com, other databases at the library and internet resources.
Today a case for my Raspberry Pi arrived from Adafruit arrived and it is time for some spring cleaning.
I was running the XBMC distro on the pi, but found it cumbersome to listen to music in the home office that way. So time to start with a fresh Raspbian install.
Here are my notes:
Get the current Raspbian release from Raspbian.org and install it on a 4GB flash disk.
Boot the new disk and make the following configurations using raspi-config which is run the first time it starts up.
- Use only 16M for GPU since I'm not running an X desktop - set appropriate timezone - set appropriate locale - expand fs to use entire 4GB disk - change pi passwd - enable ssh access - update - reboot
Now some miscellaneous setup to make life easier later on. Both tt-rss and thinkup require MySQL, but I'll also want to use it for owncloud too. So install MySQL server:
sudo apt-get install mysql-server
Avahi (aka bonjour) is a very nice network tool that is a DNS-less way to announcing your hostname on the local network. Most (all) linux tools support it, but you'll need Apple's Bonjour kit for Windows. That means you can just 'ssh raspberrypi.local' or browse to http://raspberrypi.local/
sudo apt-get install avahi-utils
I like emacs and screen is useful.
sudo apt-get install emacs23-nox screen
At this point I stop using the keyboard/monitor connected to the Raspberry Pi and use an ssh session from my laptop to do the rest.
You will need to create an owncloud admin account and will want to then expand the Advanced tab and to use a MySQL server instead of SQLite. Fill in root, mysql root password (I didn't bother to set an mysql admin password, so null in my case). For the database, use owncloud and database host localhost. It may take a couple minutes to be complete, so be patient.
tar zxvf 1.7.4.tar.gz
mv Tiny-Tiny-RSS-1.7.4 tt-rss
chown -R www-data:www-data tt-rss
You will have to manually create a mysql database and import the schema
mysql -u root mysql> create database ttrss; mysql> quit
Now import the database schema (a fancy way to say the database tables and some initial data)
 cd tt-rss/schema
  mysql -u root ttrss < ttrss_schema_mysql.sql
And a little editing the configuration file...
  cd /var/www/tt-rss

  cp config.php-dist config.php
emacs config.php (or use vi, nano, etc)
I made the following edits: define('DB_TYPE', "mysql"); define('DB_HOST', "localhost"); define('DB_USER', "root"); define('DB_NAME', "ttrss"); define('DB_PASS', "");
Back from the NH Mens' Gymnastics Championships -- Trevor placed 2nd All Around and 1st in Floor, Rings and PBars. Nice way to end his gymnastics career.
Except for the New England Regionals the beginning of April of course.
As soon as they opened the door at 8am this morning, I put the camera, tripod + arduino hack at the very top of the seating in the Verizon Wireless Center pointing down at the pit where the robots are prepped for competition.
*BEST* GSR (NH) FIRST Robotics time lapse in the pit (10fps)
GSR (NH) FIRST Robotics time lapse in the pit (5fps)
GSR (NH) FIRST Robotics time lapse in the pit (20fps)
After nearly seven hours (the length my camera's battery lasted taking photos every 30 seconds) there were 835 photos which were converted to an AVI using:
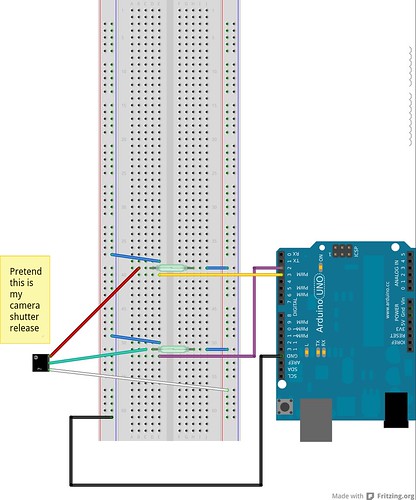
This uses two Reed Switches from Radio Shack for about $3 each -- sure I could have used other types of switches or a transitor, but they use magnetism which is cooler ;-)
Buy a cheap (~$7.00) shutter release cord to sacrifice to the project.
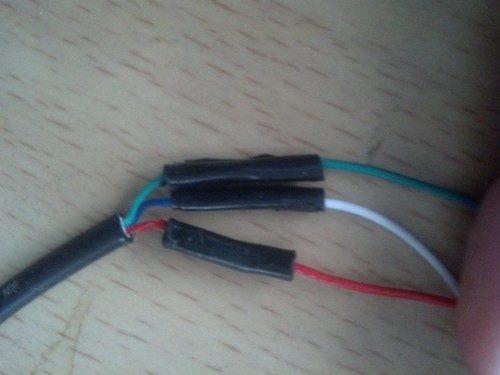
Carefully cut and strip the wires from release cord. Shorting the green and blue wires causes the camera to focus. Shorting the green, blue and red wires after focusing causes the camera to shoot.
Remember that my soldering days are long ago (hey, it was only an EE minor) and have one of the kids at our FIRST Robotics do it for me. Here is the result. Note that blue->white.
Then connected the wires from the shutter release cord to pins as follows: (see the above Fritzing image) Green -> First Reed Switch Red -> Second Reed Switch Blue/White -> shared line with the other side of the switches (not this isn't tied to ground or anything else)
Now the improved code: I call it BetterCamera.ino
/* * A better camera control for a Sony A-100 DSLR * marc@nozell.com */
// Pin 13 has an LED connected on most Arduino boards. // give it a name: int led = 13; int relayA = 2; int relayB = 3;
// the setup routine runs once when you press reset: void setup() {
Serial.begin(9600);
if (Serial.available() ) Serial.println("-- Starting ---");
// initialize the digital pin as an output. pinMode(led, OUTPUT); pinMode(relayA, OUTPUT); pinMode(relayB, OUTPUT);
}
// the loop routine runs over and over again forever: void loop() {
for (int i = 0; i < 3; i++) { // 3seconds digitalWrite(led, HIGH); delay(500); digitalWrite(led, LOW); delay(500); Serial.print("."); } Serial.println("!"); }
If you connect the release to the camera while the camera is on, even if here is no power to the arduino, it will take a couple photos. That is the kink. Just connect it up with the camera off and it will be fine.
Consider setting the photo size to 'standard' -- it saves a lot on disk space.
Now find something interesting to point your camera at and come back later. In my case it was our backyard the day after the Nemo Blizzard of 2013 (we got all the snow overnight, so it isn't riveting content).
Download all the photos to a directory and use this linux command to convert the JPG images to an AVI file. mencoder -nosound -ovc lavc -lavcopts vcodec=mjpeg -o timelapse-30fps.avi -mf type=jpeg:fps=30 mf://*.JPG
Before uploading to youtube, I ran it through Handbrake to knock down the size from 260M to less than 70MB.